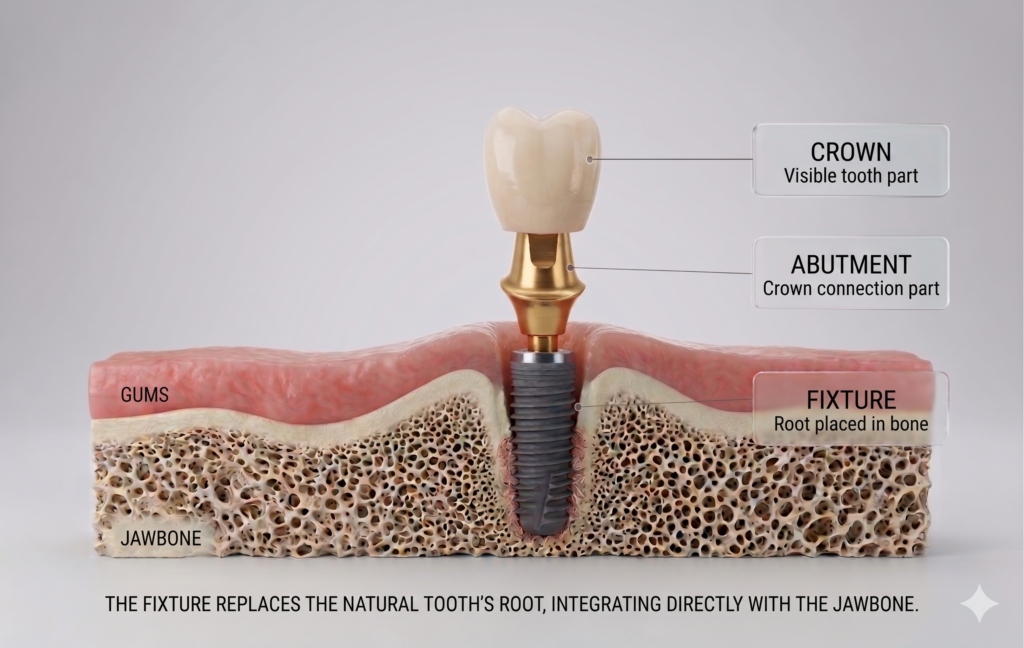
When Your Jawbone Is Too Narrow or Too Short for an Implant — A Real Bone Reconstruction Case
Medically reviewed by Dr. Junsang Lee (DDS · Director, 365 E-LOOK Dental) | Last updated: June 2026
One of the more challenging situations in implant planning is when the jawbone is both too narrow and too short. The good news: even in these cases, a dental implant is often still possible by combining several bone reconstruction techniques. In this article, we walk through an actual case from diagnosis to completion, focusing on what is done at each stage and why.
Step 1 — Diagnosis: Measuring Bone Width and Height to the Millimeter
Everything begins with a 3D CT scan. A standard (2D) X-ray shows the height of the bone, but it cannot show the width in the cheek-to-tongue direction — and that width is exactly what matters here.
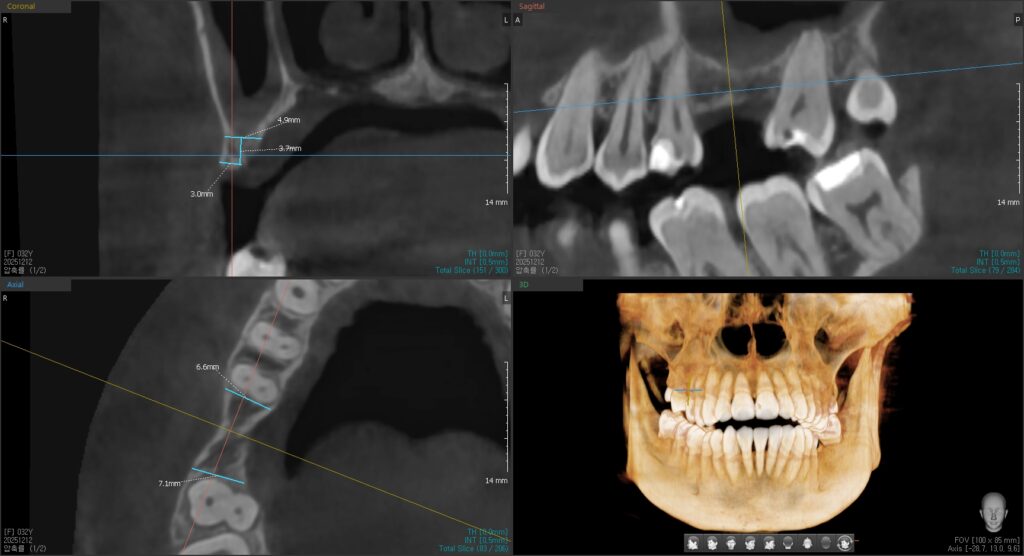
Pre-treatment 3D CT cross-section. The ridge measures about 4.9 mm at the top and narrows to roughly 3.0 mm lower down — a thin, knife-edge shape.
As the scan shows, this site has reasonable width near the top but narrows to around 3 mm further down. Placing an implant directly into bone this thin risks splitting the bone or leaving part of the implant exposed. Because this is an upper back-tooth area, the distance up to the maxillary sinus also has to be checked. These measurements are what determine which procedures to combine.
Step 2 — Adding Width and Height: Ridge Split + Sinus Lift
When the scan shows that both width and height are insufficient, both are addressed in the same surgery.
A ridge split widens a narrow ridge horizontally. The thin bone is carefully separated lengthwise, creating space between the outer and inner bone plates, and the implant is placed into that newly created space.
A sinus lift restores height. In the upper back-tooth region, the floor of the maxillary sinus is gently lifted and bone is added beneath it, creating enough vertical height to hold an implant.
In this case, both procedures were performed together, and the implant was placed into the prepared site.
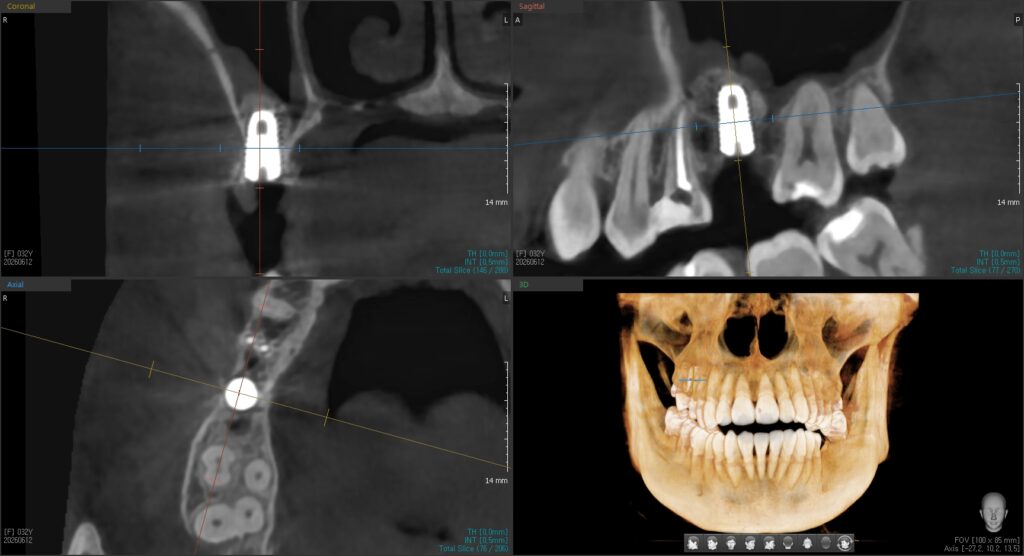
The ridge has been widened horizontally and the sinus floor lifted to gain height, with the implant placed into the prepared site.
Performing several procedures in a single surgery can, in suitable cases, shorten the overall treatment time and reduce the number of separate operations a patient goes through. This approach depends on precise diagnosis and sufficient surgical experience.
Step 3 — Filling and Protecting the Site: Guided Bone Regeneration (GBR)
Even after the implant is placed, thin areas such as the outer (cheek-side) wall often need reinforcement. This is where guided bone regeneration (GBR) comes in.
In GBR, bone graft material is packed into the deficient area and then covered with a barrier membrane. Without the membrane, soft gum tissue tends to grow into the space quickly, and where soft tissue takes over, bone cannot form properly. The membrane holds that soft tissue back, giving bone the room and time it needs to grow.
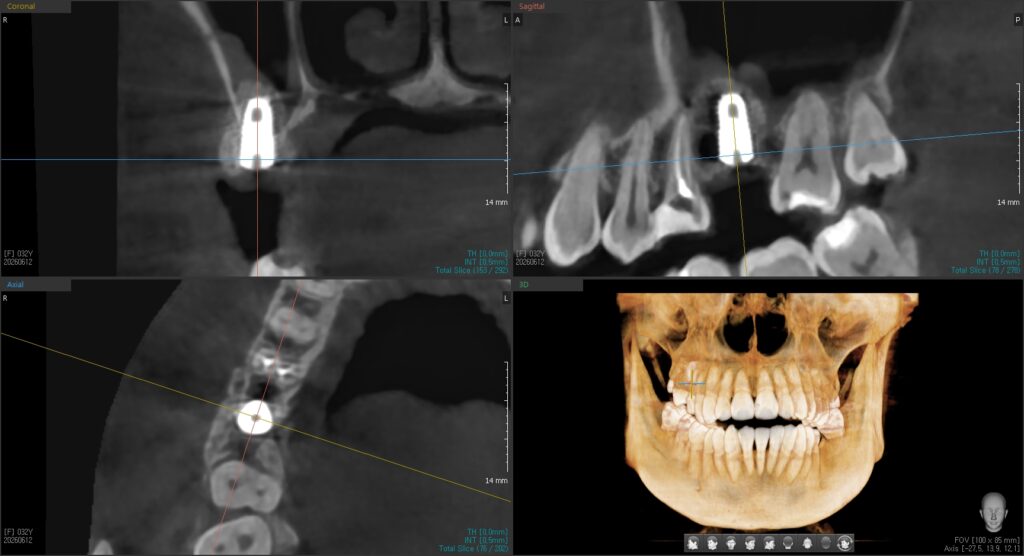
Bone graft material and a barrier membrane have been applied to the cheek-side wall of the implant. The implant sits stably within the bone.
Surrounding the implant with enough bone in this way supports a more stable foundation over the long term.
Step 4 — Healing and the Final Crown
After surgery, time is needed for the grafted bone to settle and for the implant to fuse firmly with the bone — a process called osseointegration. The healing period varies from patient to patient. Once healing is complete, a final crown is attached to the implant to restore normal function.
A Final Word
In short: the narrow width was widened with a ridge split, the missing height was rebuilt with a sinus lift, and the thin areas were reinforced with guided bone regeneration — together creating a solid foundation for the implant. A jawbone that is narrow and short is not the end of the road for an implant; far more often, it simply means more careful diagnosis and a few preparatory steps are needed.
So if you’ve been told elsewhere that an implant “isn’t possible,” it’s worth not stopping there. Confirming the actual condition of your bone with a 3D CT scan is where the possibilities usually begin.
Reference: Howe MS et al., “Long-term (10-year) dental implant survival: A systematic review,” Journal of Dentistry, 2019.
This article is for general informational purposes only. Treatment methods and outcomes vary depending on each individual’s oral condition. All procedures carry the possibility of individual variation and complications (including infection, bleeding, nerve injury, and graft failure). Diagnosis and treatment plans must be determined through consultation with your treating clinician. The images in this article are published with the patient’s written consent.